Amazon Web Services 資料一覧
AWS IoTでMQTTブローカーを作りArduinoからのセンシングデータをSNS通知する手順(AWS CLI編)
2017/06/11更新
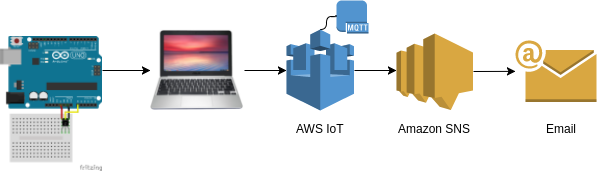
以下の記事でAWS IoTを使ったセンシングデータのSNS通知手順を示したが、AWS IoTの設定をGUI(マネジメントコンソール)でなくCLIで行う手順を示す。AWS IoT以外の設定は変わらないので割愛する。
関連資料・記事
Amazon SNS
Topic作成
% aws sns create-topic --name "mqtt_test"
{
    "TopicArn": "arn:aws:sns:ap-northeast-1:xxxxxxxxxxxx:mqtt_test"
}
通知先(Email)設定
% aws sns subscribe --topic-arn "arn:aws:sns:ap-northeast-1:xxxxxxxxxxxx:mqtt_test" --protocol email --notification-endpoint "xxx@yyy.com"
{
    "SubscriptionArn": "pending confirmation"
}
確認用のメールが届くので「Confirm subscription」をクリックしてこのメールアドレスを有効にするか、「Confirm subscription」のURLからToken="******"部分を抜き出してCLIで有効化する。
% aws sns confirm-subscription --topic-arn "arn:aws:sns:ap-northeast-1:xxxxxxxxxxxx:mqtt_test" --token "*******************************************"
{
    "SubscriptionArn": "arn:aws:sns:ap-northeast-1:xxxxxxxxxxxx:mqtt_test:************************************"
}
AWS IoT
ArduinoをThingとして登録
aws iot create-thing --thing-name "Arduino"
{
    "thingArn": "arn:aws:iot:ap-northeast-1:xxxxxxxxxxxx:thing/Arduino",
    "thingName": "Arduino"
}
センシングデータを処理するルールを設定
最初にルールにひも付けるIAMロールを作成する。
% vi role.json
{
  "Version":"2012-10-17",
  "Statement":[{
    "Effect": "Allow",
    "Principal": {
      "Service": "iot.amazonaws.com"
    },
    "Action": "sts:AssumeRole"
  }]
}

% aws iam create-role --role-name "mqtt_test_role" --assume-role-policy-document file://role.json
{
    "Role": {
        "AssumeRolePolicyDocument": {
            "Version": "2012-10-17",
            "Statement": [
                {
                    "Action": "sts:AssumeRole",
                    "Effect": "Allow",
                    "Principal": {
                        "Service": "iot.amazonaws.com"
                    }
                }
            ]
        },
        "RoleId": "*********************",
        "CreateDate": "2017-06-10T04:29:40.209Z",
        "RoleName": "mqtt_test_role",
        "Path": "/",
        "Arn": "arn:aws:iam::xxxxxxxxxxxx:role/mqtt_test_role"
    }
}
ロールが作成できたらルールを作成してひも付ける。
% vi rule.json
{
  "sql": "SELECT * FROM 'topic/test'",
  "ruleDisabled": false,
  "actions": [{
    "sns": {
      "targetArn": "arn:aws:sns:ap-northeast-1:xxxxxxxxxxxx:mqtt_test",
      "roleArn": "arn:aws:iam::xxxxxxxxxxxx:role/mqtt_test_role"
    }
  }]
}

% aws iot create-topic-rule --rule-name "sendEmail" --topic-rule-payload file://rule.json
ポリシーを作成
% vi policy.json
{
    "Version": "2012-10-17",
    "Statement": [{
        "Effect": "Allow",
        "Action": ["iot:*"],
        "Resource": ["*"]
    }]
}

% aws iot create-policy --policy-name "mqtt_policy" --policy-document file://policy.json
{
    "policyName": "mqtt_policy",
    "policyArn": "arn:aws:iot:ap-northeast-1:xxxxxxxxxxxx:policy/mqtt_policy",
    "policyDocument": "{\n    \"Version\": \"2012-10-17\",\n    \"Statement\": [{\n        \"Effect\": \"Allow\",\n        \"Action\": [\"iot:*\"],\n        \"Resource\": [\"*\"]\n    }]\n}\n",
    "policyVersionId": "1"
}
デバイス証明書の作成と有効化
% aws iot create-keys-and-certificate --set-as-active --certificate-pem-outfile cert.pem --private-key-outfile thing-private-key.pem
{
    "certificateArn": "arn:aws:iot:ap-northeast-1:xxxxxxxxxxxx:cert/********************************",
    "certificatePem": "-----BEGIN CERTIFICATE-----\n******\n-----END CERTIFICATE-----\n",
    "keyPair": {
        "PublicKey": "-----BEGIN PUBLIC KEY-----\n******\n-----END PUBLIC KEY-----\n",
        "PrivateKey": "-----BEGIN RSA PRIVATE KEY-----\n******\n-----END RSA PRIVATE KEY-----\n"
    },
    "certificateId": "********************************************************"
}
ポリシーおよびThingをデバイス証明書にアタッチ
% aws iot attach-principal-policy --policy-name "mqtt_policy" --principal "arn:aws:iot:ap-northeast-1:xxxxxxxxxxxx:cert/****************************************************************"

% aws iot attach-thing-principal --thing-name "Arduino" --principal "arn:aws:iot:ap-northeast-1:xxxxxxxxxxxx:cert/****************************************************************"
参考サイト
AWS IoT (Amazon Web Services)
AWS IoT開発者ガイド (Amazon Web Services)
AWS IoTとRaspberry PiではじめるIoT超入門 (CodeZine)
AWS IoT情報 (Qiita)