Redmine
2014/09/21更新
対応バージョン: 2.5.2
Redmine 2.xにプラグインを導入する手順を説明する。
ここでは例としてCSVファイルから一括してチケットを登録するredmine_importerを導入する。
参考) Redmine公式Wiki - プラグイン導入手順
http://www.redmine.org/projects/redmine/wiki/Plugins
ruby-1.9を使用していない場合、fastercsvをインストールしておく
% ruby -v
ruby 1.9.3p484 (2013-11-22 revision 43786) [x86_64-linux]
上記の場合はfastercsvは不要だが、必要な場合は以下の手順でインストールしておく。
% gem list fastercsv

*** LOCAL GEMS ***

% sudo gem install fastercsv

% gem list fastercsv

*** LOCAL GEMS ***

fastercsv (1.5.5)
プラグインファイルをダウンロードし、#{RAILS_ROOT}/pluginsに配置する
% cd #{RAILS_ROOT}/plugins
% unzip #{TMP}/redmine_importer-master.zip
% mv redmine_importer-master redmine_importer
DBに反映する
% rake redmine:plugins:migrate RAILS_ENV=production
Redmineを再起動し、プラグインを有効化する
Redmine付属のWebサーバを使用している場合
% cd #{RAILS_ROOT}
% ruby script/rails server -e production
Apache + Passengerを使用している場合
% sudo service httpd restart (CentOS 6.4の場合)
RedmineのGUIに管理者アカウントでログインして[管理] > [プラグイン]に進み、以下が表示されていればインストールが成功している。
Issue Importer
Issue import plugin for Redmine. ... 1.2.2
プラグインを利用する
プロジェクトの設定画面で[モジュール]タブを選び、[Importer]にチェックを入れることでプラグインが使えるようになる。
新しいプロジェクトの作成時に最初からこのチェックを入れたい場合は[管理] > [設定] > [プロジェクト]タブを選び、「新規プロジェクトにおいてデフォルトで有効になるモジュール」で[Importer]にチェックを入れておけばよい。
プロジェクトを作成すると[インポート]タブが追加されるので画面の指示に従ってCSVファイルをインポートする。
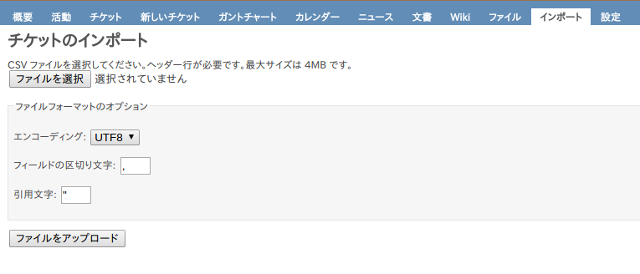
CSVは1行目にインポート対象の項目名を列挙し、2行目以降に各項目に対応する内容を記載する。
項目名や内容については既存のチケットをいったんCSV出力したものを加工すると分かりやすい。
例)
トラッカー,ステータス,優先度,題名,作成者,担当者,更新日,カテゴリ,対象バージョン,開始日,期日,予定工数,作業時間の記録,進捗率,作成日,終了日,関連するチケット,プライベート
バグ,新規,通常,"Redmineバージョンアップ",sou,kogure,,"","",2014/11/01,2014/11/01,"",0,0,,"","",いいえ
注意点は以下のとおり。
作成者と担当者はCSV出力されたlastname firstnameではなくID(login)を使う必要があるので以下のSQLで調べる
mysql> select login,lastname,firstname from redmine.users;
+--------+-----------+-----------+
| login  | lastname  | firstname |
+--------+-----------+-----------+
| admin  | Admin     | Redmine   |
| kogure | 木檜      | 和明      |
| sou    | 夏目      | 漱石      |
+--------+-----------+-----------+
2014/8/21更新
対応バージョン: 2.5.2
CentOS環境にRedmineを導入する手順を示す。データベースはMySQLを、WebサーバはApacheを、ApacheとRedmineとの連携はPassengerモジュールをそれぞれ使用する。
日本語公式サイト
導入OS
CentOS 6.4(64bit)
関連パッケージインストール
EPELリポジトリ登録(libyaml用)
% sudo su
# rpm -Uvh
# http://dl.fedoraproject.org/pub/epel/6/x86_64/epel-release-6-8.noarch.rpm
# yum repolist
Loaded plugins: fastestmirror, security
Loading mirror speeds from cached hostfile
 * base: ftp.iij.ad.jp
 * epel: ftp.kddilabs.jp
 * extras: ftp.iij.ad.jp
 * updates: centosi5.centos.org
repo id    repo name                                          status
base       CentOS-6 - Base                                     6,367
epel       Extra Packages for Enterprise Linux 6 - x86_64     11,051
extras     CentOS-6 - Extras                                      14
updates    CentOS-6 - Updates                                  1,266
repolist: 18,698
パッケージインストール
# yum -y groupinstall "Development Tools"
# yum -y install openssl-devel readline-devel zlib-devel curl-devel libyaml-devel
Apacheインストール
# yum -y install httpd
# chkconfig httpd on
# chkconfig --list httpd
httpd   0:off   1:off   2:on    3:on    4:on    5:on    6:off
MySQLインストール
# yum -y install mysql-server mysql-devel
# chkconfig mysqld on
# chkconfig --list mysqld
mysqld  0:off   1:off   2:on    3:on    4:on    5:on    6:off
文字コード変更
サーバ/クライアント双方の文字コードを明示的にUTF-8にする。
# cd /etc
# cp -p my.cnf my.cnf.org
# vi my.cnf

[mysqld]
:
character-set-server = utf8 <--- 追加

[mysql]
default-character-set = utf8 <--- 追加

# diff my.cnf my.cnf.org
7d6
< character-set-server = utf8
12,14d10
<
< [mysql]
< default-character-set = utf8

# /etc/init.d/mysqld start

# mysqladmin -u root password *****

# mysql -u root -p
mysql> status;
:
(サーバ側のキャラクターセット)
Server characterset:    utf8
Db     characterset:    utf8

(クライアント側のキャラクターセット)
Client characterset:    utf8
Conn.  characterset:    utf8

mysql> show variables like "char%";
+--------------------------+----------------------------+
| Variable_name            | Value                      |
+--------------------------+----------------------------+
| character_set_client     | utf8                       |
| character_set_connection | utf8                       |
| character_set_database   | utf8                       |
| character_set_filesystem | binary                     |
| character_set_results    | utf8                       |
| character_set_server     | utf8                       |
| character_set_system     | utf8                       |
| character_sets_dir       | /usr/share/mysql/charsets/ |
+--------------------------+----------------------------+
Redmine用データベース作成
mysql> create database redmine character set utf8;
mysql> create user 'redmine'@'localhost' identified by '*****'; <- パスワード
mysql> grant all privileges on redmine.* to 'redmine'@'localhost';
mysql> quit
Rubyインストール
ここではRubyの複数のバージョンが混在できるようにrbenvを使ってインストールする。
rbenv + ruby-buildインストール
# yum -y install git
# git --version
git version 1.7.1

# cd /usr/local
# git clone git://github.com/sstephenson/rbenv.git

# echo 'export RBENV_ROOT="/usr/local/rbenv"' >> /etc/profile
# echo 'export PATH="${RBENV_ROOT}/bin:${PATH}"' >> /etc/profile
# echo 'eval "$(rbenv init -)"' >> /etc/profile
# . /etc/profile

# mkdir /usr/local/rbenv/plugins
# cd /usr/local/rbenv/plugins
# git clone git://github.com/sstephenson/ruby-build.git
Rubyインストール
# yum -y install gcc make openssl-devel
# rbenv install -l
  1.8.6-p383
  1.8.6-p420
  1.8.7-p249
:
# rbenv install 2.0.0-p481

# rbenv global 2.0.0-p481

# ruby -v
ruby 2.0.0p481 (2014-05-08 revision 45883) [x86_64-linux]
Ruby関連パッケージインストール
RubyGemsインストール
# cd /usr/local
# git clone https://github.com/rubygems/rubygems.git rubygems
# cd rubygems
# ruby setup.rb
# gem -v
2.0.14
bundleインストール
# gem install bundler
# . /etc/profile
# bundler -v
Bundler version 1.6.5
Redmineインストール
Redmine関連パッケージインストール
# yum -y install ImageMagick ImageMagick-devel
# yum -y install ipa-pgothic-fonts
Redmineインストール
Apacheのドキュメントルートにインストール(配置)する。
# exit
% cd /var/tmp
% curl -O http://www.redmine.org/releases/redmine-2.5.2.tar.gz
% tar zxvf redmine-2.5.2.tar.gz
% mv redmine-2.5.2 <ドキュメントルート>
% ln -s <ドキュメントルート>/redmine-2.5.2/public <ドキュメントルート>/redmine
% cd <ドキュメントルート>/redmine-2.5.2/config
データベース設定
% cp database.yml.example database.yml
% vi database.yml

production:
  adapter: mysql2
  database: redmine
  host: localhost
  username: root <- redmine
  password: "" <--- パスワード
  encoding: utf8
メール設定(ログイン認証を行なっているSMTPサーバを使用する場合)
% cp configuration.yml.example configuration.yml
% vi configuration.yml

production:
  email_delivery:
    delivery_method: :smtp
    smtp_settings:
      address: "mail.example.com" <---- SMTPサーバのアドレス
      port: 587 <---------------------- SMTPサーバのポート
      authentication: :login
      domain: 'example.com' <---------- ドメイン
      user_name: 'admin@example.com' <- サーバに接続するアカウント
      password: ******** <------------- 上記アカウントのパスワード
      enable_starttls_auto: false <---- (追加)

  rmagick_font_path: /usr/share/fonts/ipa-pgothic/ipagp.ttf

% sudo su
# chmod -R go+w <ドキュメントルート>/redmine
# exit
Gemパッケージインストール
% cd /nas/contents/www/redmine-2.5.2
% bundle install --without development test

% bundle exec rake generate_secret_token
% RAILS_ENV=production bundle exec rake db:migrate
Passengerインストール
関連パッケージインストール
# yum -y install apr-devel apr-util-devel httpd-devel
Apache Passengerモジュールインストール
# cd /nas/contents/www/redmine-2.5.2
# gem install passenger --no-rdoc --no-ri

# . /etc/profile
# passenger-install-apache2-module
:
 1. The Apache 2 module will be installed for you.
 2. You'll learn how to configure Apache.
 3. You'll learn how to deploy a Ruby on Rails application.
:
Press Enter to continue, or Ctrl-C to abort.
<- Enter

Use <space> to select.
If the menu doesn't display correctly, press '!'

 ? ?  Ruby
   ?  Python
   ?  Node.js
   ?  Meteor

<- space + Enter

:

Suppose you have a web application in /somewhere. Add a virtual host to your
Apache configuration file and set its DocumentRoot to /somewhere/public:

   <VirtualHost *:80>
      ServerName www.yourhost.com
      # !!! Be sure to point DocumentRoot to 'public'!
      DocumentRoot /somewhere/public
      <Directory /somewhere/public>
         # This relaxes Apache security settings.
         AllowOverride all
         # MultiViews must be turned off.
         Options -MultiViews
         # Uncomment this if you're on Apache >= 2.4:
         #Require all granted
      </Directory>
   </VirtualHost>
:
Pasengerのモジュール定義をApacheの設定ファイルに書き込む
# passenger-install-apache2-module --snippet > /etc/httpd/conf.d/passenger.conf
サブディレクトリ/redmineでRedmineを実行する定義を追加する
# echo "RailsBaseURI /redmine" >> /etc/httpd/conf.d/passenger.conf

# cat /etc/httpd/conf.d/passenger.conf
LoadModule passenger_module
/usr/local/rbenv/versions/2.0.0-p481/lib/ruby/gems/2.0.0/gems/passenger-4.0.48/buildout/apache2/mod_passenger.so
<IfModule mod_passenger.c>
  PassengerRoot
/usr/local/rbenv/versions/2.0.0-p481/lib/ruby/gems/2.0.0/gems/passenger-4.0.48
  PassengerDefaultRuby /usr/local/rbenv/versions/2.0.0-p481/bin/ruby
</IfModule>
RailsBaseURI /redmine
どこかのタイミングでDAVのロックDBを格納するファイルのパーミッションが変わってしまうので修正する
# chmod 777 /var/lib/dav
Apache再起動
# service httpd restart
http://localhost/redmineにアクセスして管理画面が表示されればOKである。
管理者アカウントはadmin/admin、ログインしたらパスワードを変更しておく。